
Medicare: Complete Hospital and Clinic Appointment System with Admin, Web, User and Doctor Apps
Written by Rishabh Bose
Last updated
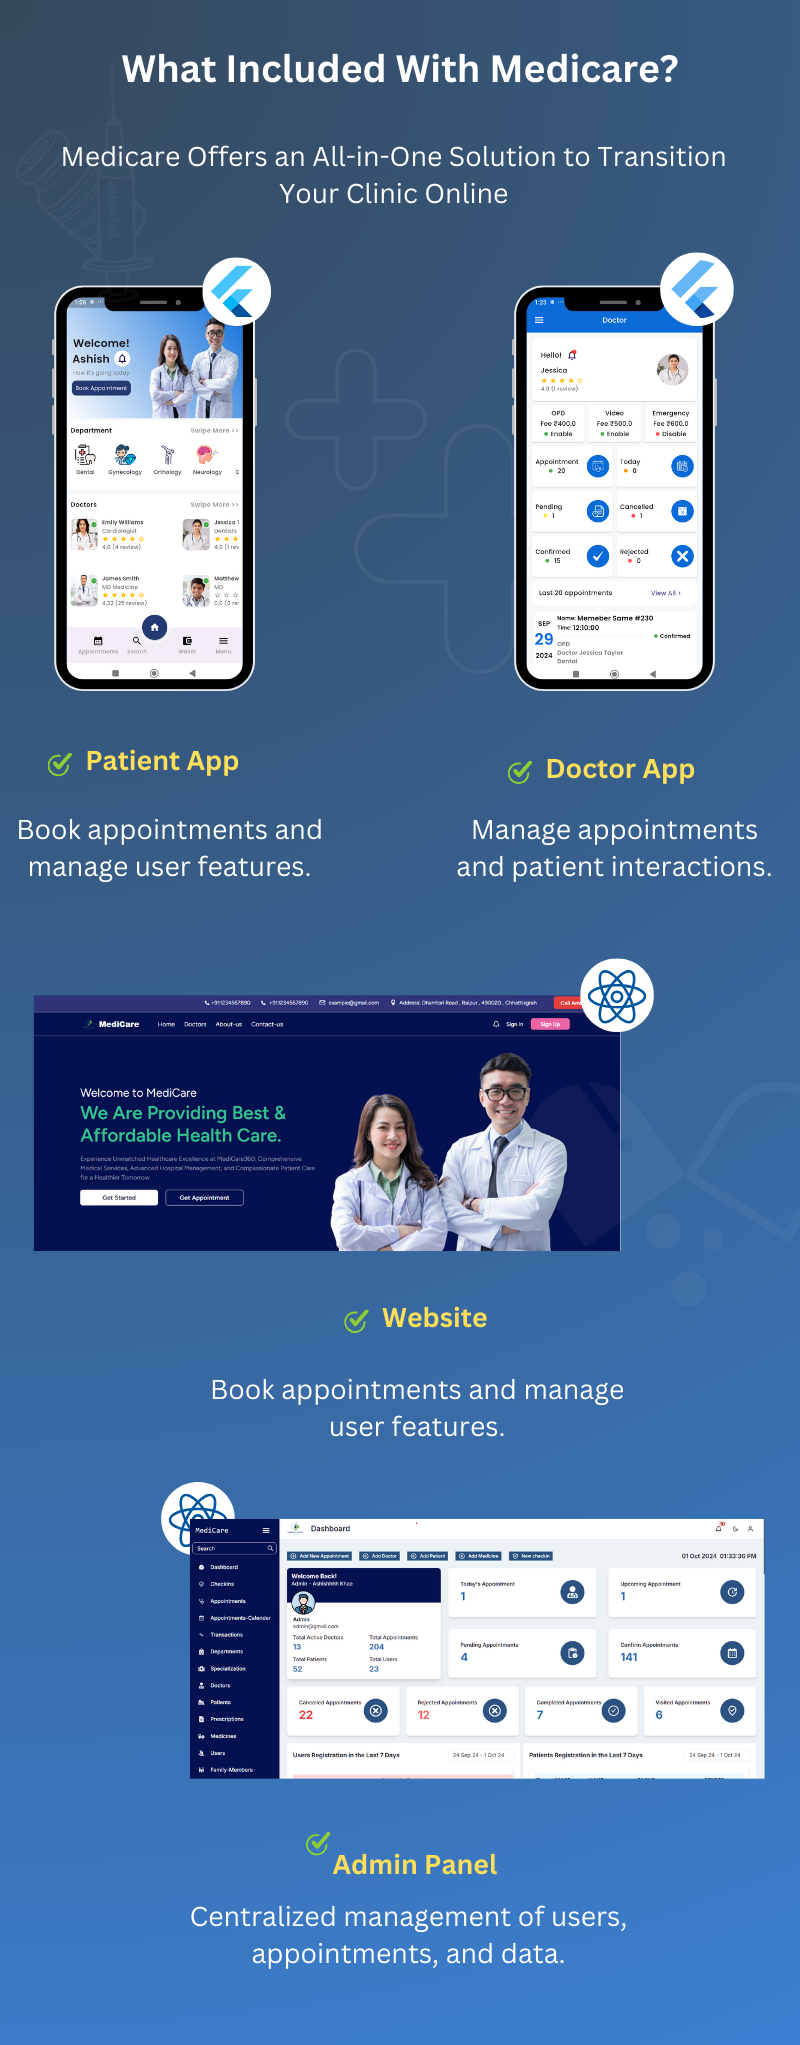
Medicare is a cutting-edge, full-stack Clinic Management System (CMS) tailored to transform healthcare practices. Designed for single-doctor clinics to multi-specialty hospitals, Medicare simplifies clinic operations, enhances patient care, and optimizes administrative efficiency.
With Medicare, healthcare providers can:
Effortlessly manage patient appointments and doctors' schedules.
Streamline clinic administration, from medical records to billing.
Enhance patient experiences with easy booking and consultation processes.
This intuitive, user-friendly system ensures seamless communication between clinic staff, doctors, and patients, creating a more efficient and patient-focused healthcare environment.
Discover how Medicare can adapt to the unique needs of your healthcare facility and take your practice to the next level.

For a better demo experience, please create a demo user account from the user app and a delivery man credential from your demo admin panel to use the delivery man app.


Core Functionalities
Managing appointments is one of the core functionalities of Medicare. Once the doctors are set up, both the admin and patients can generate appointments. Appointments can be managed by the admin, front desk, and doctor, ensuring a smooth workflow across all parties involved.
Generate Appointment
Appointments can be generated from the Admin Panel, Web App, and Mobile App. Let's understand how appointments can be generated in each of these platforms.
Appointment From Admin Panel
Go to the Appointments section in the Admin Panel.
Click on Add New.
Add a new patient or select an existing patient from the list.
Fill in the appointment details, including selecting the doctor, appointment type, and appointment date and time and other information.
Click Add Appointment.
You can find the added appointment in appointment section.
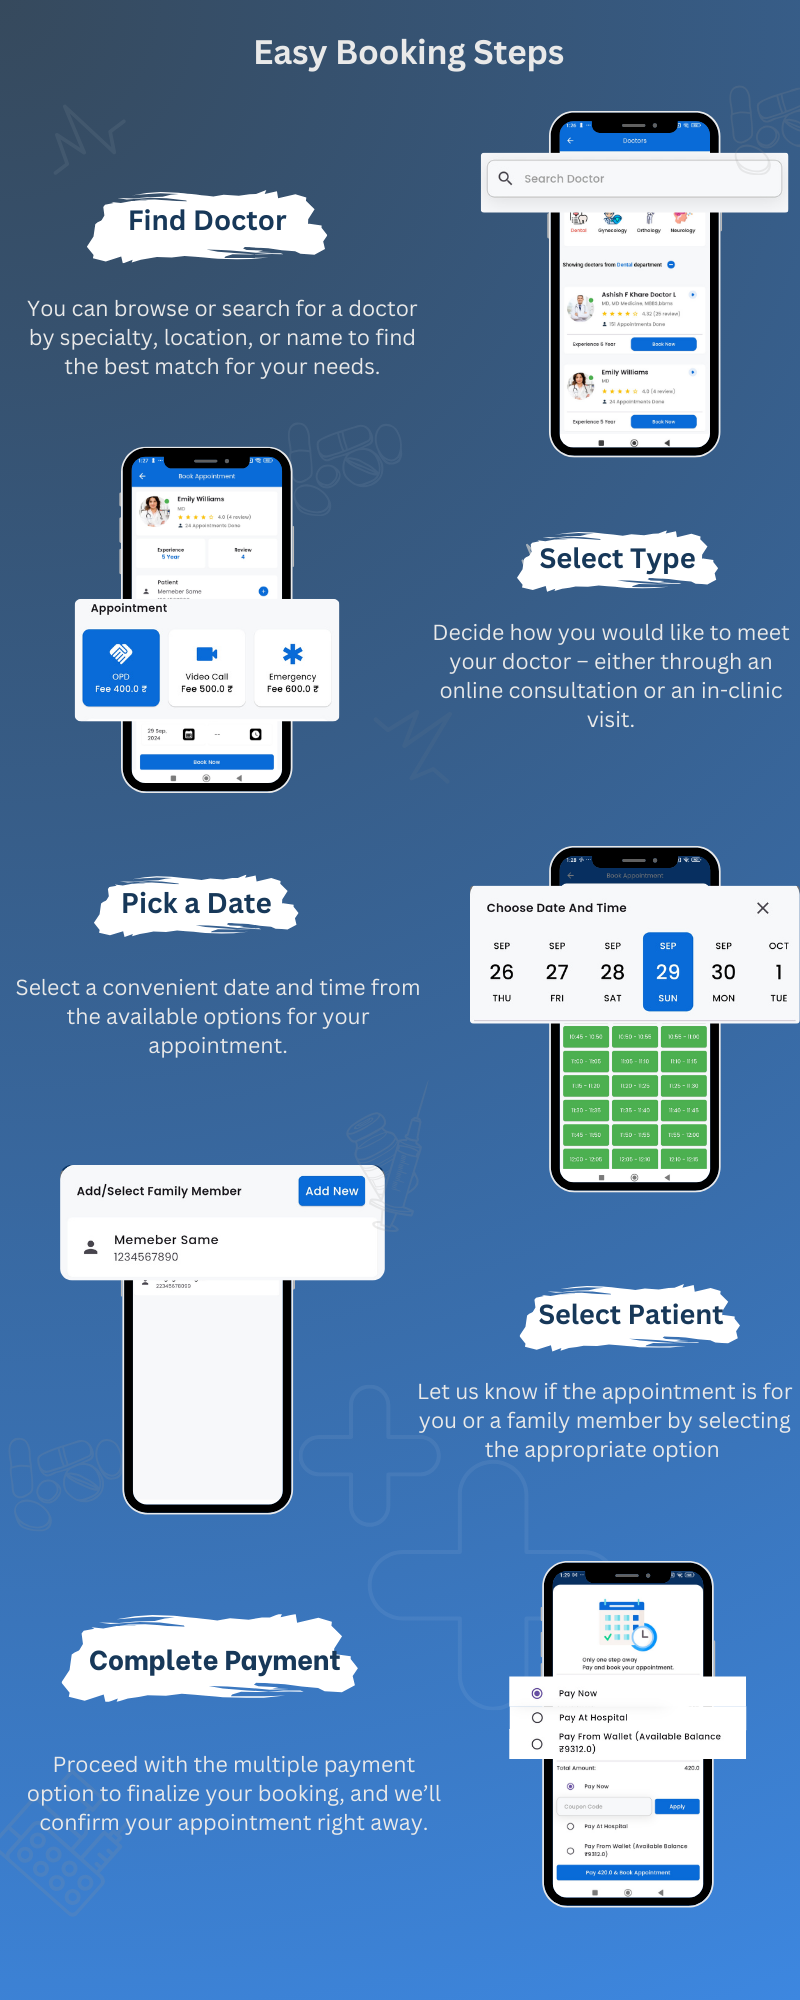
Appointment From User App
Go to the Department Page or the Search Page.
Click on Book Now.
Select the appointment type and choose the date and time for the appointment.
Select an patient or click Add New Patient to enter a new patient's details.
Choose the payment option and confirm the booking.
Appointment From web App
Click on the Get Appointment button.
Select the doctor for the appointment.
Choose the date and time for the appointment.
Select an existing patient or add a new patient.
Choose the payment option (if applicable).
Click Confirm Booking to finalize the appointment.
Manage Appointment
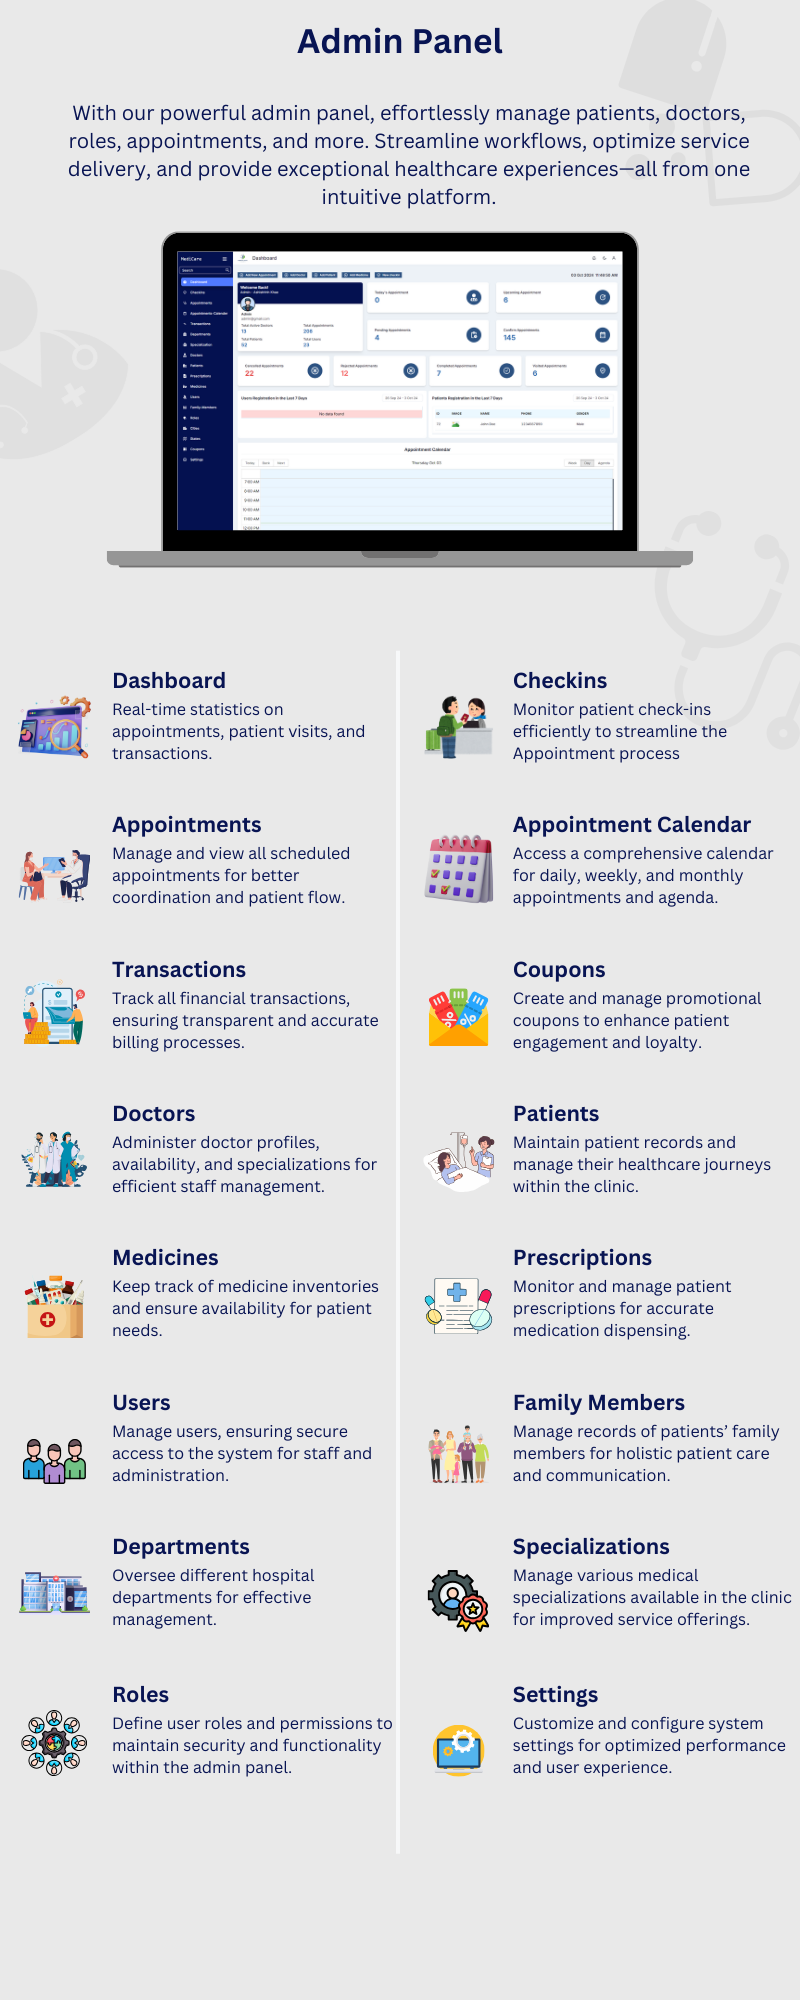
Admin, doctors, and front desk staff can find the generated appointments in the Appointment List, Dashboard, and Appointment Calendar. From these sections, they can view and edit the appointment details as needed.
Update Patient Details
From the "Edit Appointment" page, you can update the patient's details by clicking the link button associated with the patient's information. This button will navigate you to the Patient Details page, where you can update the patient's information as needed.
Update Doctor
You cannot update the doctor for an existing appointment. If a change is required, you must reject the current appointment and create a new one with the updated doctor details
Update Appointment Status
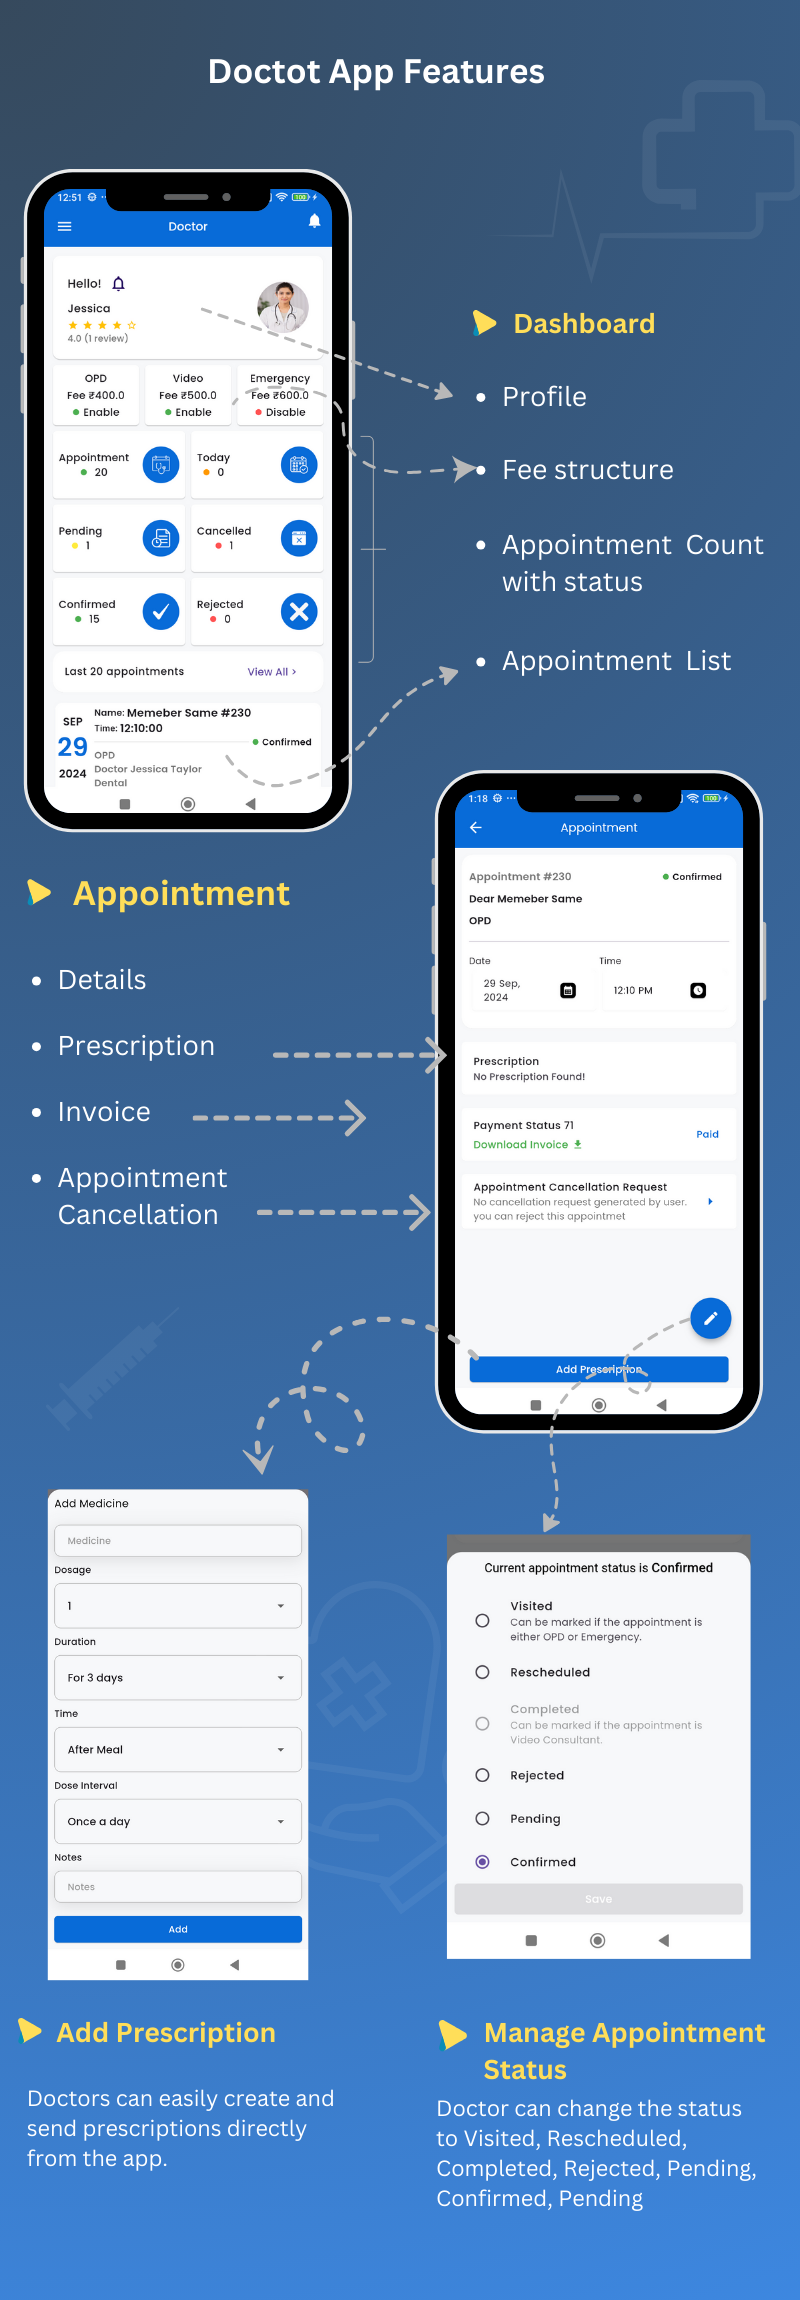
Our system supports a total of seven appointment statuses, each representing a specific stage in the appointment process. These statuses help track and manage appointments efficiently, ensuring clear communication between admins, doctors, and patients.
Confirmed - Initially, all appointments are generated with the "Confirmed" status. This status can be changed later based on further actions or updates.
Pending - This status indicates that the appointment is not yet confirmed. It can either be rejected or rescheduled based on further actions.
Visited - This status indicates that the doctor has checked the patient and the appointment has been completed successfully. Note that once an appointment is updated to "Visited," it cannot be reverted or changed to another status.
Completed - This status indicates that the appointment was a video consultation and has been successfully completed by the doctor. Note that once an appointment is updated to "Completed," it cannot be reverted or changed to another status.
Rescheduled - This status is used when the appointment date or time is changed. The rescheduling operation can only be performed through the Admin Panel.
Rejected - This status indicates that the appointment has been rejected. This action is taken through the Admin.
Cancelled - This status indicates that the appointment has been canceled by the user. The cancellation process begins when the user submits a cancellation request from the User App (Edit Appointment page). The admin can then view the request in the "Edit Appointment" page or the "Cancellation Requests" page. If the admin approves the request, the appointment status is updated to "Cancelled."
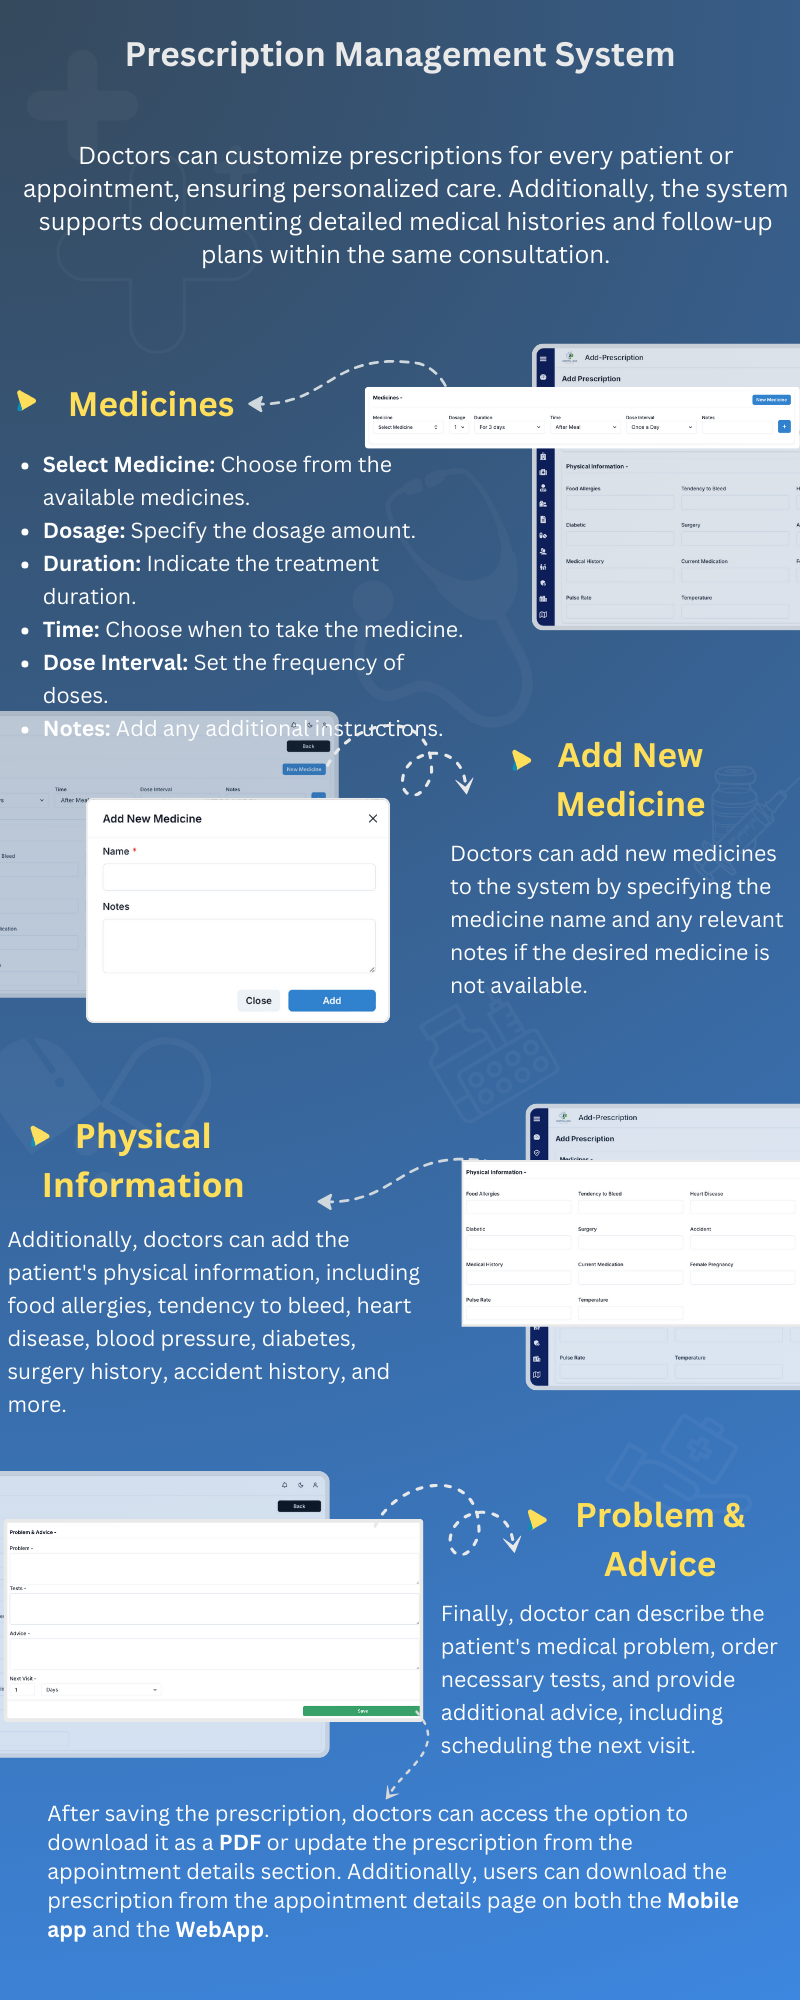
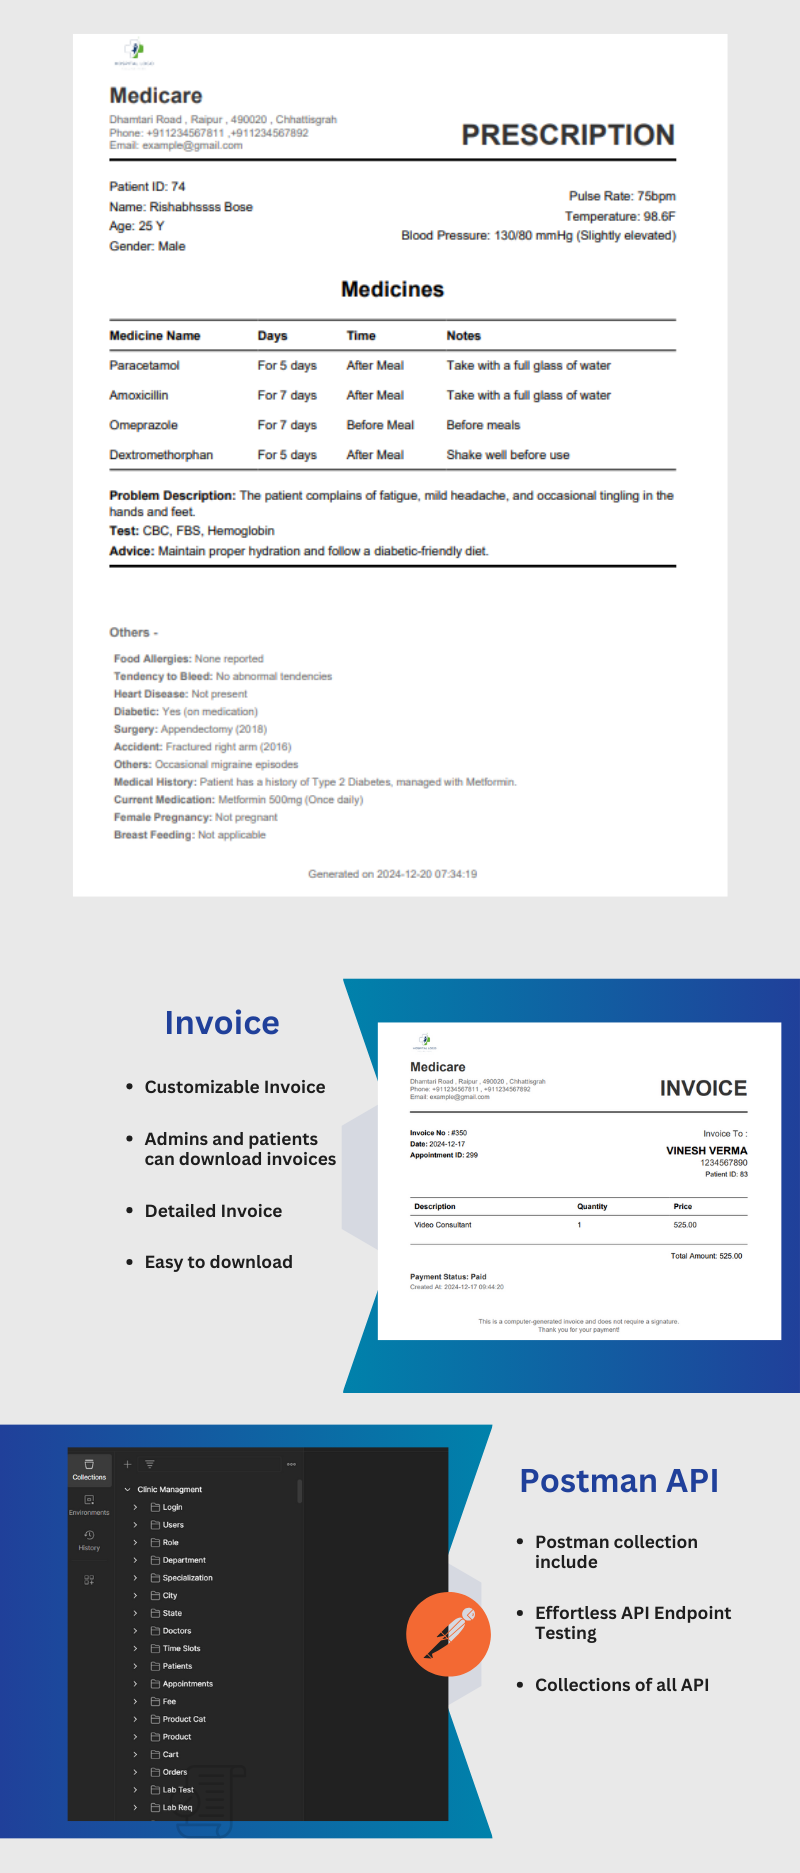
Add/Update/Print Prescriptions
The prescription can be checked from the "Edit Appointment" page or the "Prescription" page. You can add or update the prescription directly from the "Edit Appointment" page by entering the necessary details and saving the changes.
Remember, if you want to map all medicines, press the "New Medicine" button or go to the "Medicine" page to add new medicines. Once you've mapped all the medicines, there’s no need to type them multiple times; you can simply select them from the list.
Print Prescription - Once you have added the prescription, you can easily print it from the Prescription List. Simply click the "Print" button to generate a printable version of the prescription.
Patient File
The patient file can be checked and added from the "Edit Appointment" page or the "Patient File" page. To add a new file, go to the "Patient File" page and press the "Add New" button. Fill out the required form and press "Add File" to save the file. You can add, update and delete reports or any other files related to the patient.
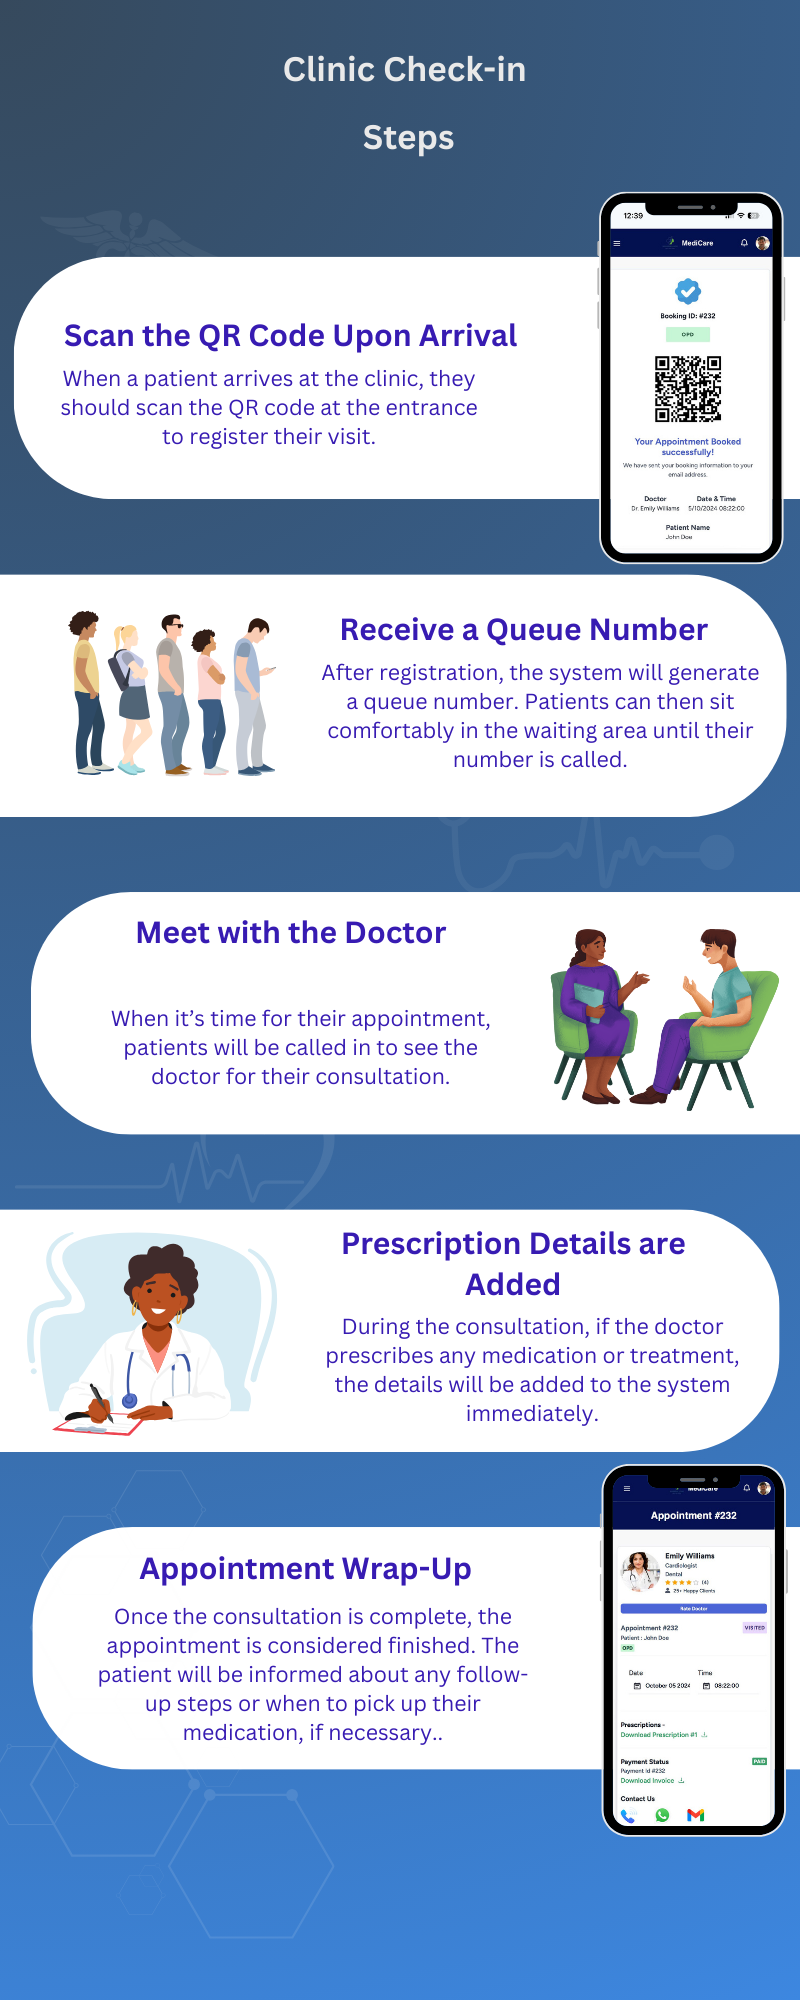
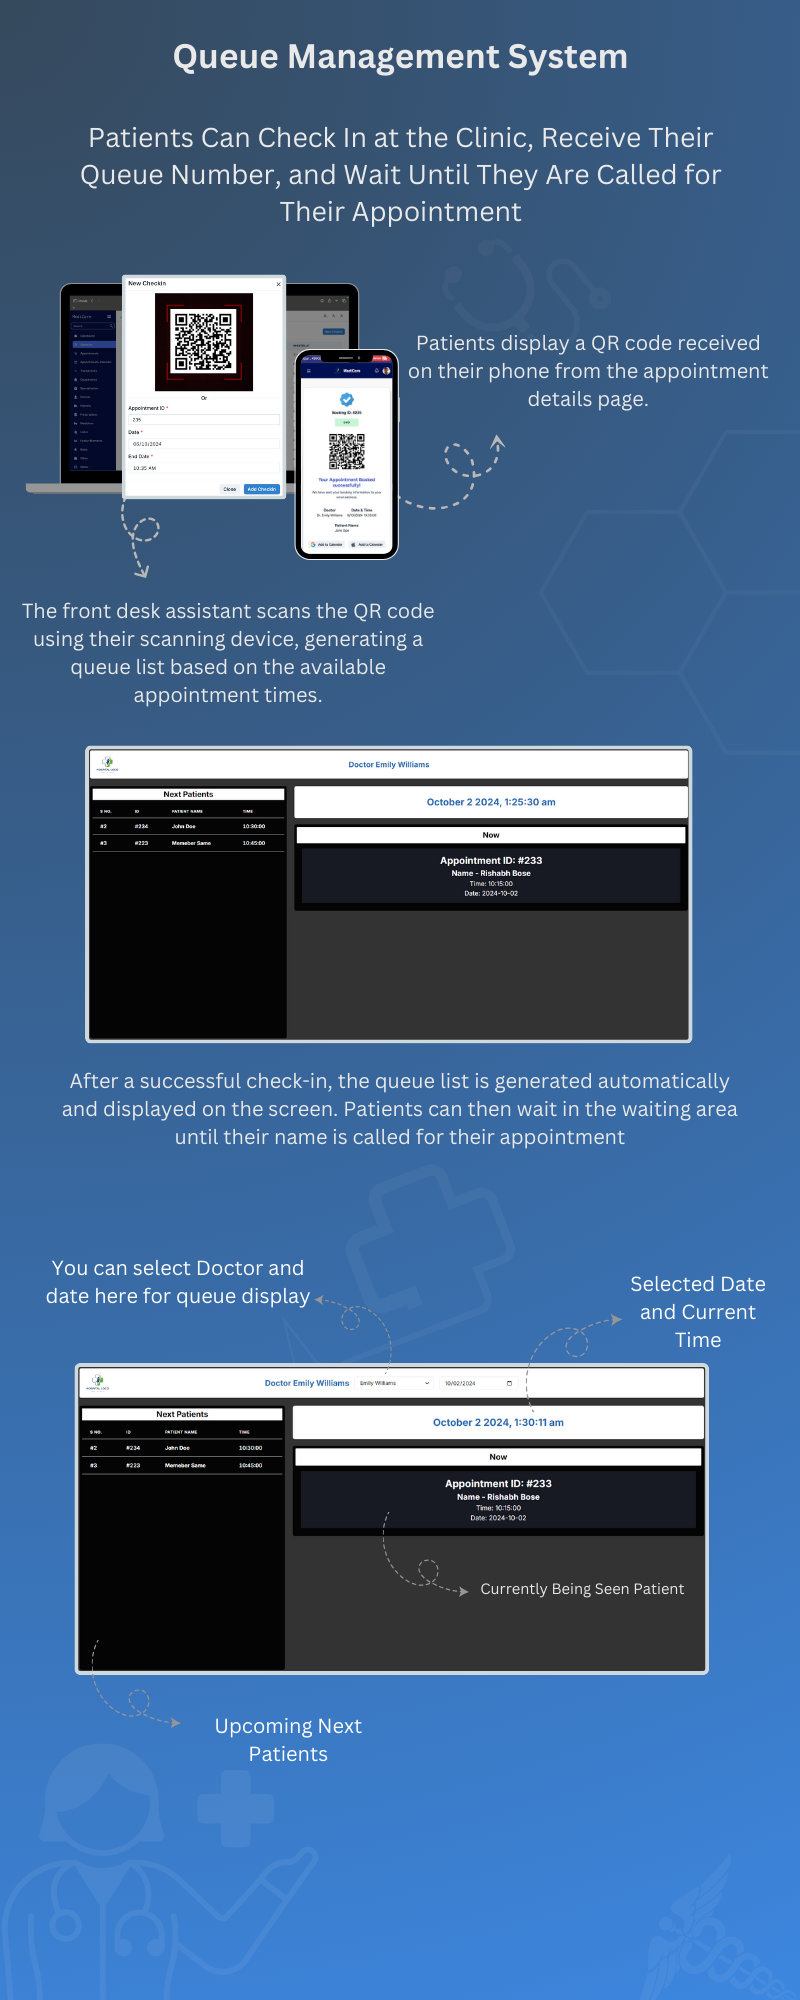
Appointment Checkins
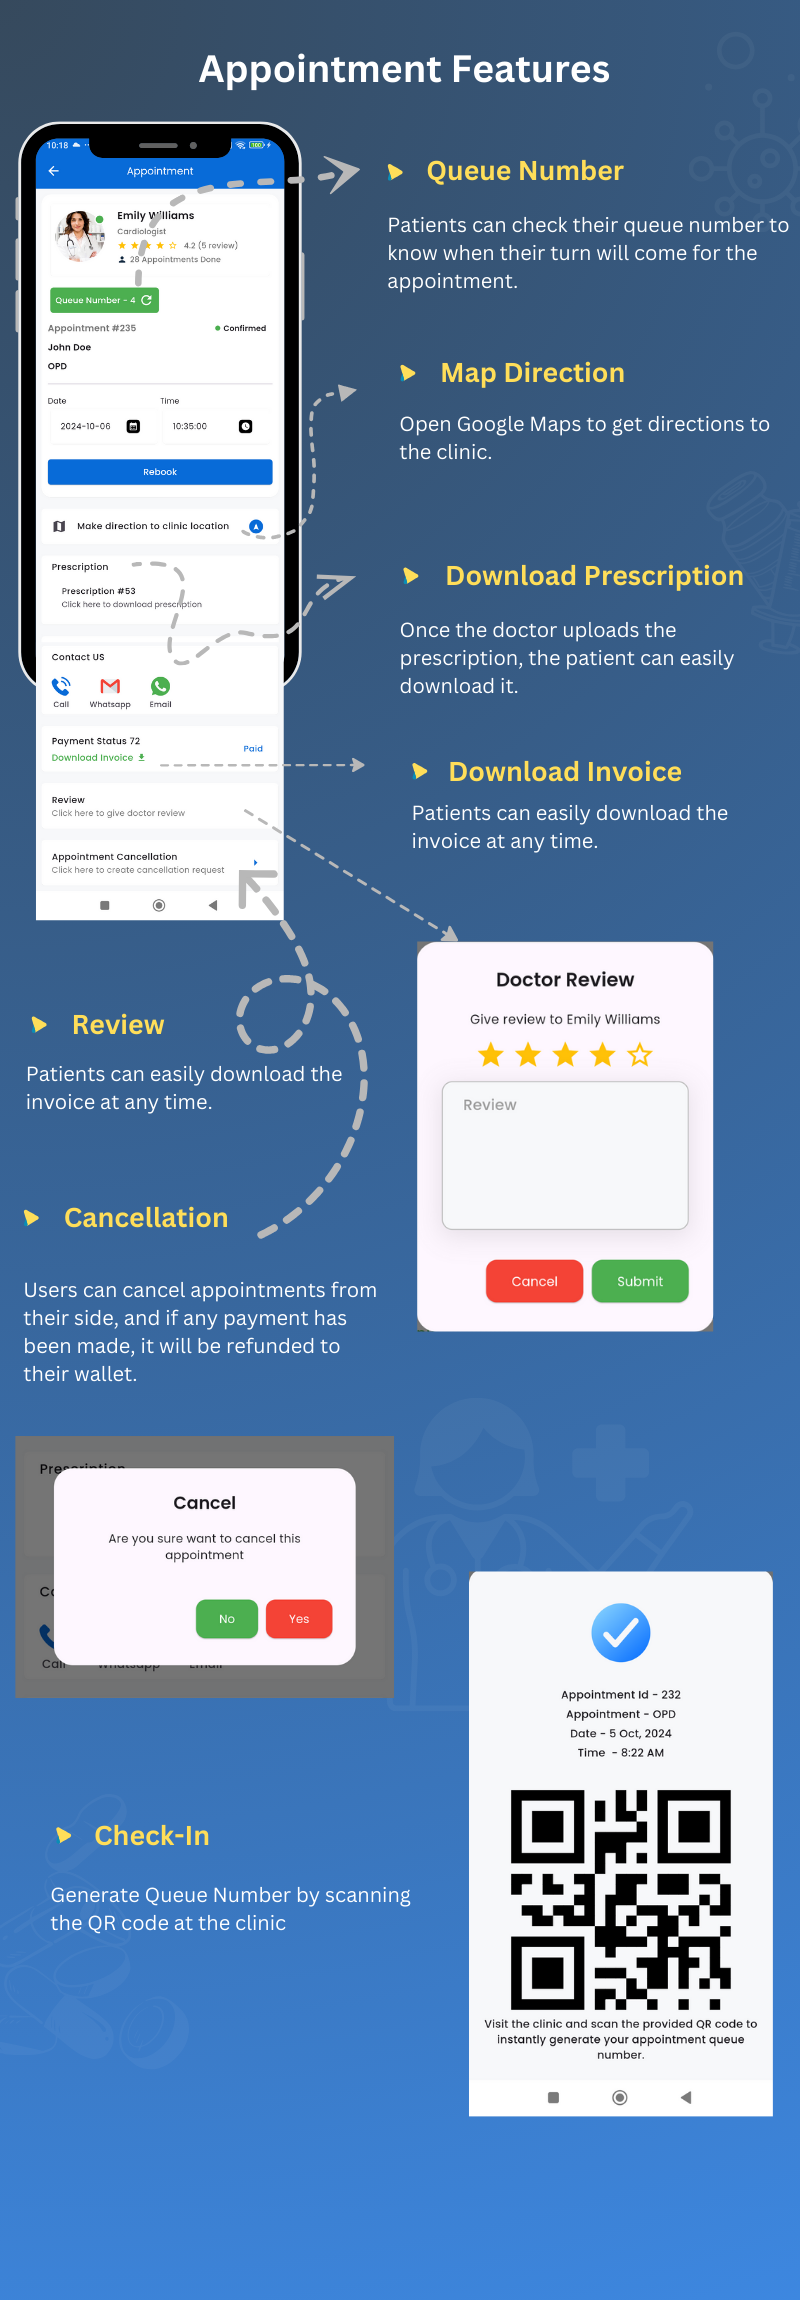
Appointment Check-in is an additional and exciting feature of Medicare. You can check in the patient and generate a queue number, which will be displayed on the clinic screen. The user can also view their queue number from the appointment details page.
Once the patient arrives at your clinic, you can check in the appointment from the Check-in page. To do so, press the "Check-in" button, where you can fill out the check-in form or scan the QR code. The QR code can be obtained from the user's phone on the Appointment Details page.
Appointment Cancellation
In the case of appointment cancellations or rejections, a refund will be generated only for paid appointments. This applies when the payment for the appointment was initiated by the user and successfully captured.
Appointment Calender
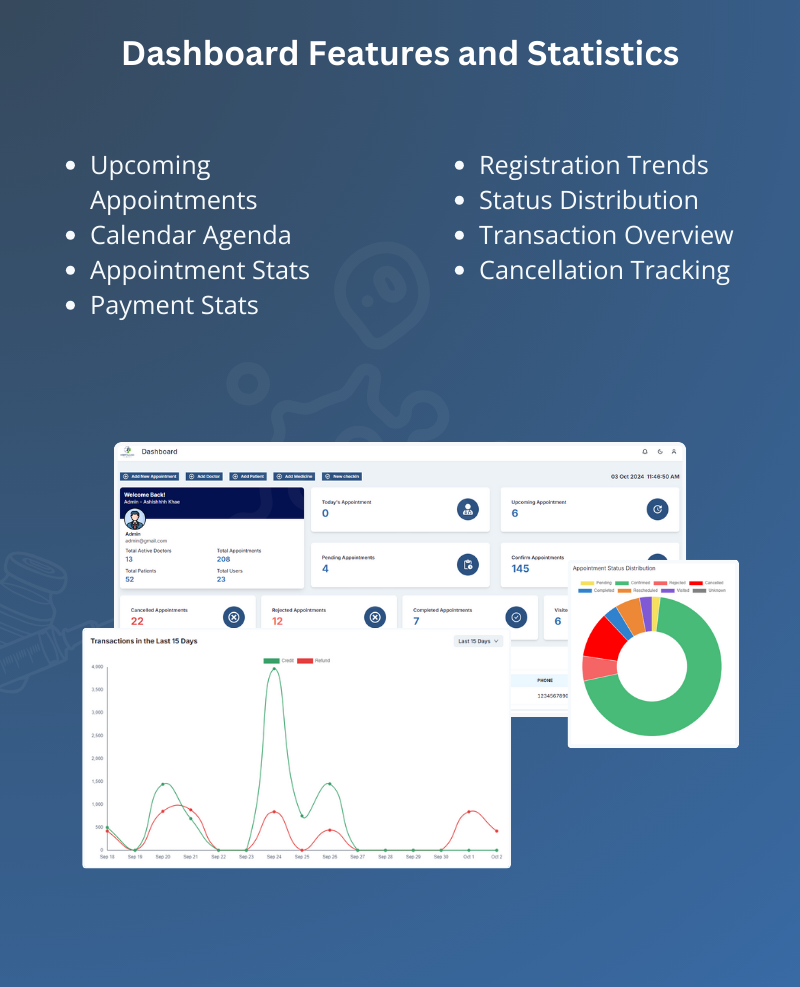
From this page, you can view all appointments with their scheduled times. The appointments are arranged in a calendar view, making it easy for the admin to see appointments on a daily basis. This layout helps in quickly identifying and managing appointments.
Appointment Payment
In the Appointment Details page, you can view the appointment invoice, transaction details, and payment methods. This allows you to track the payment status and manage financial transactions related to the appointment.
Join Video Call
Before starting the video appointment, make sure you have configured Zoom in the Admin Settings page.
For video calls, we are using Zoom. In the Appointment Details page, find the meeting link field and click on the link button. This will navigate you to the Zoom link, where you can wait for the user to join the meeting.
Users can also join the meeting from the Appointment Details page (User App) by clicking the "Video Call" button.
Remember, if you reject or reschedule the appointment, the change will also be reflected in the Zoom panel. The appointment will be deleted or rescheduled accordingly in Zoom as well.
Transaction
On this page, you will find three tabs: All Transactions, Payment, and Invoice. When a user completes a transaction, the record is stored in the Transaction section.
All Transactions: Displays transaction IDs and detailed records of all transactions.
Invoice: Contains the invoice details associated with each transaction.
Payment: Shows the attached transaction ID along with the invoice ID and other relevant details.